
You deal with back pain every day, and you want safe, simple moves that ease tension fast. This article shows a set of gentle stretches and yoga poses you can try at home to reduce stiffness, loosen tight muscles, and calm discomfort without needing special equipment.
You will learn quick, practical stretches and yoga poses that target common sources of back pain so you can feel better sooner. The steps that follow include easy-to-follow options for relief, plus brief guidance on causes and precautions so you can practice with more confidence.
What Causes Back Pain?
You often feel back pain because of specific stresses on muscles, joints, and discs. Identifying whether the problem comes from muscle balance, posture, an injury, or long-term wear helps you choose the right stretches and poses.
Muscular Imbalances and Posture
Muscular imbalances happen when some muscles are tight and others are weak. For example, tight hip flexors and weak glutes pull your pelvis forward, increasing lower back strain. Poor posture while sitting or standing adds constant load to certain spinal joints and soft tissues.
You can spot imbalance signs like one-sided pain, forward head position, rounded shoulders, or an exaggerated lower back curve. These patterns make everyday tasks, such as lifting or bending, trigger pain more easily. Targeted stretching for tight areas and strengthening of weak muscles reduces load on the spine and eases pain over time.
Acute Versus Chronic Pain
Acute back pain starts suddenly after an event like lifting, twisting, or a fall. It usually lasts days to weeks and often improves with rest, gentle movement, and short-term pain control. Acute pain can signal a muscle strain, ligament sprain, or disc irritation.
Chronic pain lasts longer than three months and may come from ongoing issues such as degenerative discs, arthritis, or persistent muscle imbalance. Chronic pain often includes flare-ups and periods of lower pain. Managing it requires a plan: regular mobility work, strength training, posture correction, and sometimes medical review to rule out serious conditions.
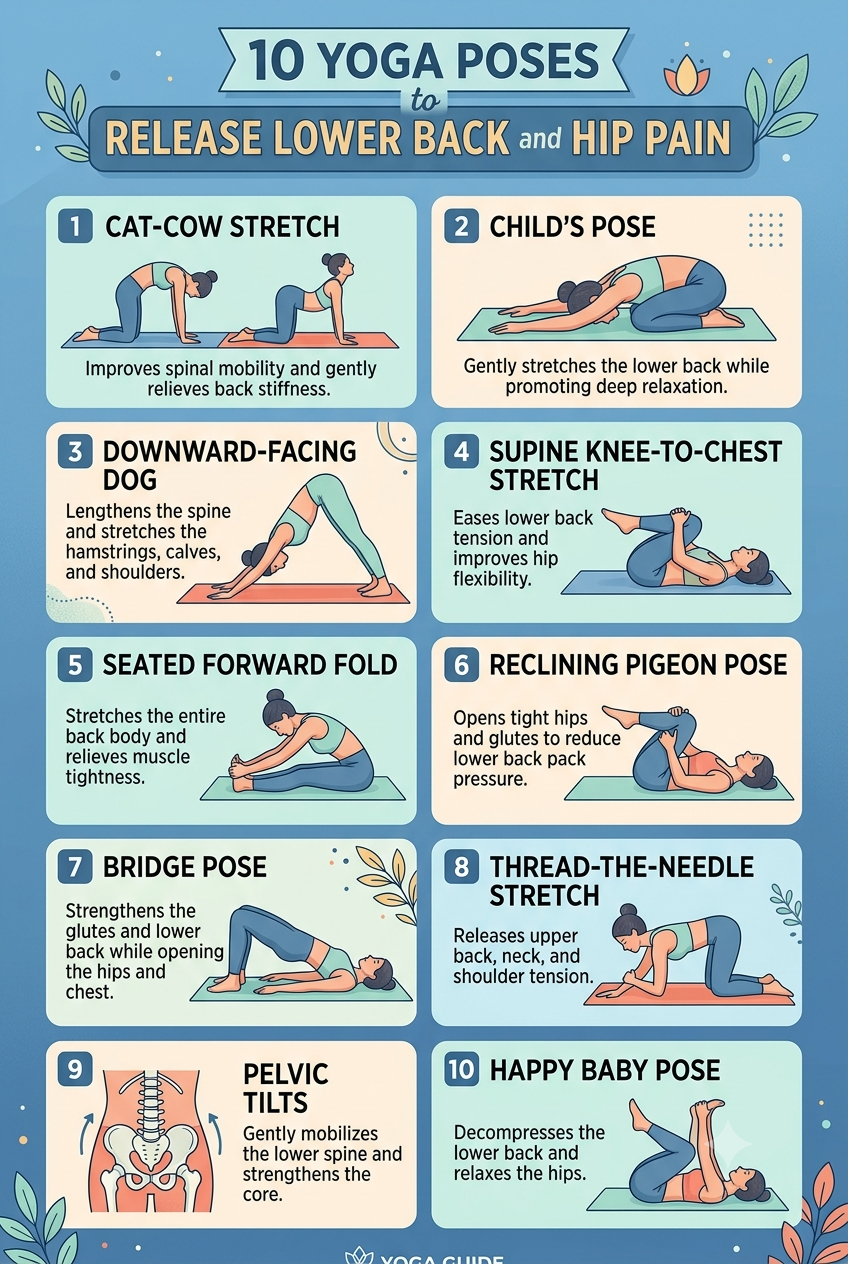
10. Happy Baby Pose (Ananda Balasana)
Lie on your back and bend your knees toward your chest. Hold the outer edges of your feet or ankles, keeping your arms inside your knees if that feels right.
Gently draw your knees toward the floor beside your ribs while keeping your lower back long. Breathe slowly and evenly to let the hips and inner thighs release.
Allow the sacrum to widen and the lower spine to decompress as you relax into the pose. Rocking lightly can massage the lower back, but stay within a pain-free range.
If you have tight shoulders or limited hamstring flexibility, hold behind your shins or use a strap around the feet. Avoid this pose with recent knee, ankle, or severe lower-back injuries unless cleared by a healthcare provider.
9. Pelvic Tilts
Pelvic tilts are a simple, low-risk exercise that can ease lower back tension and improve spinal mobility. You lie on your back with knees bent and gently rock your pelvis to flatten your lower back against the floor.
Perform the movement slowly and with control. Breathe out as you tilt and hold for a second, then inhale as you return to neutral.
Do 8–15 repetitions, two or three times a day as needed. Over time, pelvic tilts help strengthen your deep core and reduce pressure on the lumbar spine.
If you feel sharp pain, stop and consult a health professional. Modify the range of motion so the movement stays comfortable and pain-free.
8. Thread-the-Needle Stretch
Begin on your hands and knees with a neutral spine. Keep your hips over your knees and your shoulders over your wrists.
Slide one arm underneath the opposite arm, palm facing up, and rest your shoulder and ear on the mat. Breathe slowly as you feel a gentle twist along your upper back and shoulder.
Hold for 20–40 seconds, then return to all fours and repeat on the other side. Move slowly and stop if you feel sharp pain.
This stretch targets the upper back, shoulders, and neck while improving spinal mobility. Use a pillow or folded blanket under your shoulder if you need extra support.
7. Bridge Pose (Setu Bandha Sarvangasana)
Lie on your back with knees bent and feet hip-width apart. Press your feet and arms into the mat as you lift your hips toward the ceiling.
Keep your thighs parallel and avoid squeezing the knees together. Gently draw your shoulder blades under your back to open the chest without compressing the neck.
Hold for 20–45 seconds, breathing steadily. You should feel the glutes and lower back working; stop if you feel sharp pain.
To release, lower your hips slowly vertebra by vertebra. Use a block under your sacrum for a supported variation if you need less effort or extra stability.
Bridge Pose strengthens the glutes, hamstrings, and lower back while opening the chest and hip flexors. It can reduce mild back tension when practiced with careful alignment.
6. Reclining Pigeon Pose (Supta Kapotasana)
Lie on your back with knees bent and feet flat. Cross one ankle over the opposite thigh so your shin forms a figure four.
Hold behind the uncrossed thigh and gently draw it toward your chest. Keep your lower back pressed to the mat and breathe slowly.
You will feel a stretch in the hip, glutes, and outer thigh on the crossed side. If you feel sharp pain in the knee, ease off or try a gentler bend in the crossed leg.
Hold for 20–60 seconds, then switch sides. This pose can relieve hip-related pressure that often contributes to lower back tightness.
5. Seated Forward Fold (Paschimottanasana)
Sit with your legs straight and feet flexed. Keep your spine long as you inhale, then hinge from the hips to fold forward on an exhale.
Reach toward your shins, ankles, or feet without forcing the motion. Bend your knees slightly if your hamstrings or lower back feel tight to protect your spine.
Hold a steady breath and relax into the stretch for 20–60 seconds. You should feel a gentle lengthening along the back of your body, not sharp pain.
This pose helps stretch hamstrings, lower back, and calves while calming your nervous system. Modify with a strap around your feet or a rolled blanket under your knees to make the pose accessible.
4. Supine Knee-to-Chest Stretch
Lie on your back with knees bent and feet flat on the floor. Gently bring one knee toward your chest, using both hands to hold the shin just below the knee.
Keep your other leg bent with the foot on the floor, or extend it straight for a deeper stretch. Hold the position for 20–30 seconds while breathing slowly and evenly.
Release the knee and repeat on the other side. Perform 2–4 repetitions per leg, once or twice daily, and stop if you feel sharp pain.
This stretch helps ease tension in the lower back and can improve hip flexibility. Warm up briefly with light walking first to reduce the risk of strain.
3. Downward-Facing Dog (Adho Mukha Svanasana)
Start on your hands and knees, then lift your hips up and back until your body forms an inverted V shape. Spread your fingers, press evenly through your palms, and keep a soft bend in the knees if your hamstrings feel tight.
This pose lengthens the spine and gently stretches the hamstrings, calves, and shoulders. It also engages your arms and core, which can reduce pressure on the lower back when you hold the alignment.
Breathe steadily while you hold the pose for 30 seconds to one minute, or shorter if you need to. To come out, bend the knees, lower the hips, and return to all fours slowly.
Modify by lifting the heels on a folded mat or by using a yoga block under each hand for less strain. Stop if you feel sharp pain, and consult a clinician if your back pain is severe or persistent.
2. Child’s Pose (Balasana)
You kneel on the floor, sit back on your heels, and fold forward until your forehead rests on the mat. This pose gently lengthens the spine and eases pressure in the lower back.
Keep your arms extended ahead for a mild shoulder and upper-back stretch, or place them alongside your body to deepen the rest. Breathe slowly and let each exhale soften your muscles and lower back tension.
If your knees or hips feel tight, place a folded blanket between your thighs and calves or under your hips for support. Small adjustments make the pose more comfortable and let you stay longer without strain.
Practice Child’s Pose for one to five minutes when you need immediate relief or a pause between stronger poses. Stop if you feel sharp pain and consult a healthcare professional for persistent or worsening back pain.
1. Cat-Cow Stretch (Marjaryasana–Bitilasana)
Start on your hands and knees with your wrists under your shoulders and knees under your hips. Keep your spine neutral and your gaze down to maintain a long neck.
Inhale and drop your belly toward the mat while lifting your chest and tailbone for Cow Pose. Move slowly and feel the gentle extension through your lower back.
Exhale and round your spine upward, tucking your chin and tailbone for Cat Pose. Focus on smooth, even breaths as you flow between the two positions.
Repeat this movement 8–12 times, matching each motion to your inhale or exhale. This sequence helps increase spinal mobility, relieve mild back tension, and prepare your body for other stretches.
Precautions and Best Practices
Follow these steps to reduce risk and get the most benefit: check medical issues, start gently, and adjust poses to match your strength and pain level.
Safety Considerations Before Stretching
Check with your healthcare provider if you have recent injury, osteoporosis, nerve pain, or are pregnant. These conditions may need tailored guidance or imaging before you start any new stretch or yoga pose.
If you feel sharp pain, numbness, or burning during a move, stop immediately. Pain that radiates down the leg, sudden weakness, or loss of bladder/bowel control needs urgent medical attention.
Start each session with 5–10 minutes of gentle movement, like walking or marching in place, to warm tissues. Use a firm but cushioned surface and wear non-slip socks or go barefoot. Keep breathing steady; hold each pose for 20–60 seconds unless pain increases.
Modifying Poses for Different Fitness Levels
Match pose intensity to your current fitness and flexibility. Beginners should reduce range of motion, use props (blocks, straps, bolsters), and perform poses near a chair or wall for balance. For example, do a supported child’s pose with a bolster under your torso to ease lower-back stretch.
If you are more fit, deepen stretches gradually and add core-strengthening variations to support the spine. Avoid forcing deeper ranges; progress by 5–10% per week. For chronic or recurring issues, work with a physical therapist or certified yoga instructor who can prescribe specific modifications and a safe progress plan.